

by bob pastusek
Notwithstanding two major engine failures requiring overhaul/rebuild in the 1500 hours I've flown in N437RP since 2008, the airframe has been remarkably free of defects or malfunctions. I replaced the cabin door pressure seal after many attempts to patch it, and installed new gas springs on the nose gear and cabin door a couple of years ago. I've been through three sets of brake pads and MLG tires, and one nose tire. All in all, it's been a very reliable and maintenance-free airframe—so I've become a bit complacent in assuming it would always be so.
Bearing Issues
During this year's condition inspection (the 6th), I found a couple of significant "wear and tear" items that I wanted to alert you to. My left outboard elevator hinge bearing developed measurable "free play" over the years, although I keep them well-lubricated and check them regularly. My check procedure is to hold the elevator trailing edge immobile at elevator deflection angles while attempting to move the elevator vertically at the hinge line. The goal is to check for hinge play at different elevator deflection angles. What I discovered is that the maximum wear occurs in the normal cruise position of the elevator—in my case, with the elevator positioned slightly below parallel to the horizontal. (It’s important to note that a slight change in elevator angle minimizes the free play—or wear indication— so you much check for hinge wear throughout the range of elevator movement.) Four of the bearings showed minimal wear, while the left outboard was worn enough to generate a clunk/clunk sound when tested. When I removed the elevators, I found all five of the bearings had noticeable wear.
The fix is very simple: new bearings are readily available from Kit Components, Inc. (Lancair), and are easy to install. I removed the bearing holders from the back of the horizontal stabilizer to facilitate pressing in the new bearings. I ordered and installed one new bearing holder after noting that the bearing had turned in its aluminum holder, and used new mounting bolts and locking nuts throughout, even though the removed hardware appeared serviceable. This is the first time my elevators have been off the airplane since final assembly, and it was a two-person job requiring patience and perseverance to get the hinge bolts—especially—reinstalled and torqued properly. A thorough inspection of the elevators and attaching hardware showed no cracks or other problems.
My observation/conclusion: The elevator tends to vibrate/oscillate during normal flight operations, causing bearing wear. This would be considerably exaggerated if the elevator pivoted on the hinge bolts or aluminum housing rather than the very hard bearing surfaces. The vibration and wear increases as the bearings loosen up, and the only fix is to replace them when the free play becomes unacceptable, as indicated by the described wear test.
MLG Actuator Assemblies
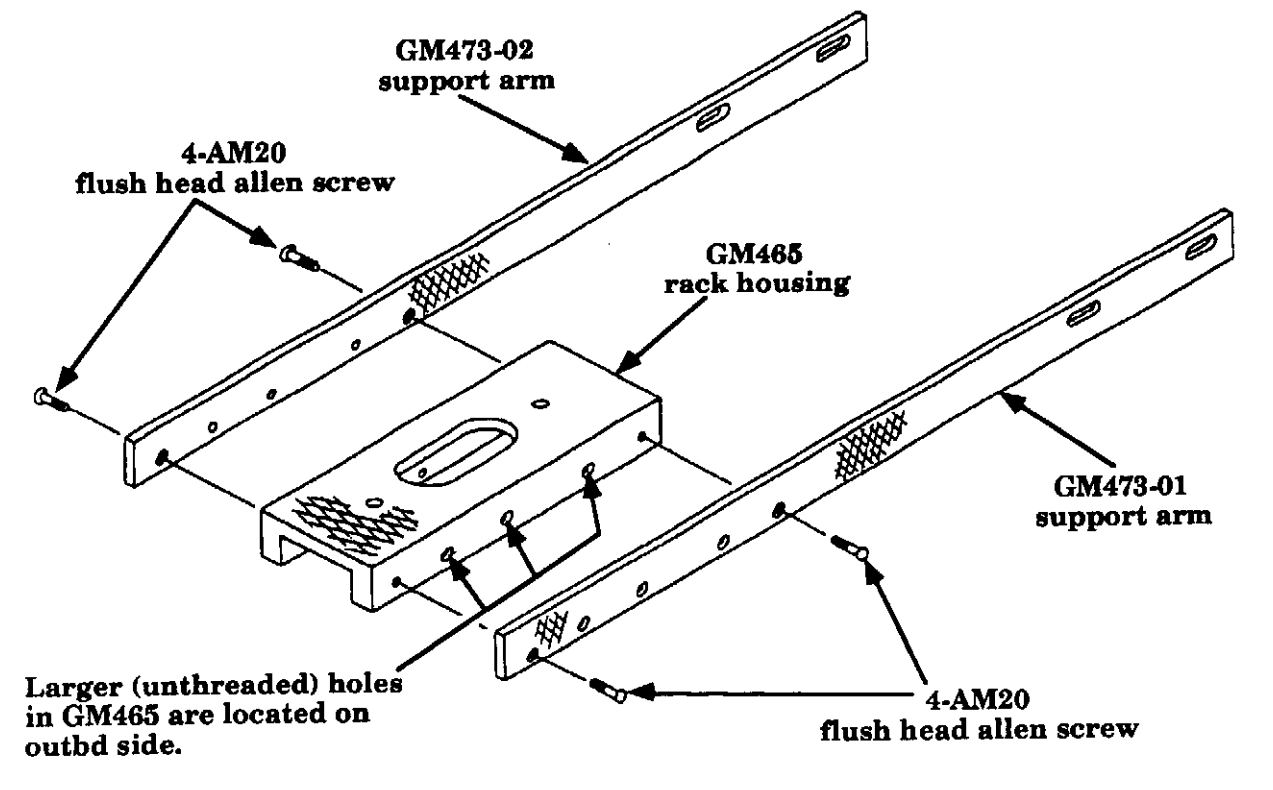
My second significant deficiency was with the main landing gear actuator assemblies under the rear seat. During my inspection/lubrication of the rack and pinion part of MLG retraction assembly I noticed a ¼" countersunk, Allen-head screw was partially backed out of the slider assembly that sits on top of the MLG. These are the small, black, partially extended screw in the center of the picture below, identified as 4-AM20 in the diagram from the build manual.
 Click for larger Click for larger
|
 Click for larger Click for larger
|
There are two screws attaching each aluminum support arm to the sides of the rack-and-pinion assembly. The support arms (GM473-01/02 in the diagram) connect the rack housing to its associated grey hydraulic actuator, and provide the primary load path for retracting and extending the gear. The bolts holding the other end of the arms to the actuator were safety-wired and secure. Fortunately for me, there are secondary load paths for operating the gear, but these will not carry the load indefinitely. Upon further inspection, I found that four of the eight total screws were missing, and two were so loose they were not securing the assembly from moving (note the separation of the strap from the rack-and-pinion assembly in the lower left corner of the photo—the result of both screws being absent on that side).
I need to also note that only two of the eight screws in question are directly visible from the landing gear door opening. Some of the others can be felt or viewed with a mirror, but at least two of them require removal of the cabin rear seat bottom to determine their security. Only four—at most—can be removed/replaced without first removing the seat bottom. Since this is one of the pressure bulkheads in the IV-P, removal and re-installation are major tasks.
Upon inspection, I could not find remains of any screw-locking sealant in the vacant holes. As I assembled all of this myself when building the airplane, I have run short on others to blame for this mistake. I was able to replace all eight screws with stainless steel equivalents and installed them with #242 Loctite. I also added these screws as a specific check item to my condition inspection checklist.
I suspect that the gear would have started making "funny noises" before it completely failed to extend/retract, but fortunately I no longer need to know if this is fact or hope…
Gear Actuator Rebuild
N437RP has had a small, niggling hydraulic fluid leak at the MLG down-lock pin for several years. I have wiped up the fluid and watched the reservoir level, but the leak was just enough to leave a trace at the top of the pin; never enough to run/drip. When I determined that the actuator would have to be removed to repair this, I put on it the deferred, “someday” maintenance list. Since I had the seat bottom out for the MLG repair, I took time to overhaul the right main gear actuator. Kit Components had an overhaul kit in stock, and with one notable exception (see below) the overhaul was very straightforward. Consider ordering an extra overhaul kit if you attempt this; they are inexpensive and one of the seals is easy to damage during installation.
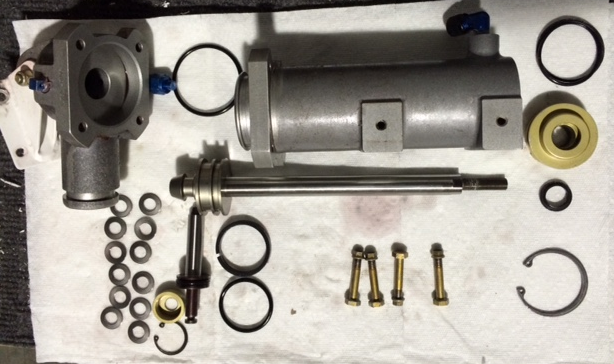 There are a lot more parts inside than you might suspect, so some care and documentation during disassembly is essential. Several years ago Lancair started installing two additional Bellville spring washers (the lower left side of the picture) in these actuators. I tried to find the SB or other documentation for this without luck. As my gear has worked well for almost ten years now, I chose to re-assemble what I had.
Also the operating shaft seal that fits inside the gold-colored cylinder end closure (the small black ring on the right side of the picture) is devilishly difficult to remove, and harder to replace without damaging it. It's also difficult to get the operating rod past the flats near the threaded end when it's put through the new seal. If you are not familiar with working on hydraulics this might be a good project to pay Lancair or a hydraulic shop to do for you. Also, although I did not do so, I'd strongly recommend testing the re-assembled cylinder at operating pressure before installation. The removal/re-installation is not difficult, but the working area is constrained, making it a tedious job at best.
For questions/comments about this post contact Bob via email at r.pastusek [at] lancairowners.com.