

This Tool Could Save You Thousands
by bob pastusek
The Lancair IV-P cabin door is secured by two latching mechanisms. Each mechanism is independently operated using a separate handle, and either handle may be operated from inside or outside the cabin. The rear handle is directly attached to three latches on the bottom of the door via a pushrod. The forward handle is attached to sprocket/chain drives that operate two latches on the forward door face and three on the rear face. The ES and unpressurized IVs have a single handle connected to two or three latches at the bottom of the door. All are of identical construction and function.
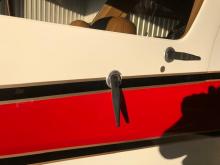 A failure of either latch mechanism, with the door latched, will make it difficult to gain access to the interior without significant—and costly—damage to the aircraft. There is a tool, however, than can help you unlatch the door--with a specific failure mode. When the screw on the external handle shaft that engages and turns the internal latch mechanism breaks, the handle will rotate through 360 degrees without unlatching the door. (The picture at left shows the handle in a "non-standard" position—click for larger.) This is the most frequent failure mode reported in the IV-P fleet, and if it happens to you the unlatch tool described in this article can save your bacon.
NOTE: This unlatch tool is only useful for opening the cabin door FROM OUTSIDE the aircraft, and for this specific failure mode--the exterior handle turns freely but does not unlock the door. The tool should be carried with the airplane at all times and needs to be accessible when the cabin door is locked. My tool has been used successfully to open three IV-P doors exhibiting this failure mode over the past ten years—fortunately not my own. If you are inside the aircraft when the latch fails you can still unlatch the door. That procedure is described later in this article.
How The Tool Works
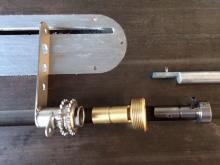
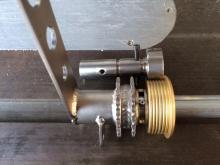
The three pictures below show a forward latch mechanism. The left picture shows the mechansm assembled. It includes the inside door handle (far left), attached chain sprockets, and gold-anodized escutcheon—bonded into the cabin door as seen in the above picture—and a black steel #8 screw threaded into the actuating shaft. The actuating shaft rotates inside the escutcheon. The center picture shows the mechanism disassembled. It includes everything shown in the picture at left and adds the business end of the unlatch tool (upper right). You can better see the actuating shaft with the #8 screw attached in the right picture. The critical part is the black screw, which serves two functions: 1) It retains the actuating shaft in the assembly, and 2) It actuates the chain sprockets that lock/unlock the forward and aft door latches as you turn the outside handle. The greater the operating force required to turn the outside handle (usually due to high friction on the latches), the greater the stress on this screw. If (when?) the screw breaks, the exterior handle cannot actuate the sprocket to disengage the door latches. The picture at right shows the unlatch tool inserted in place of the exterior handle and shaft. Note how the pin engages the slot where the screw normally resides. Please note that this tool will not open a door that has a jammed door lock. For this reason, I cover my airplane when leaving it away from home, rather than locking the cabin door.

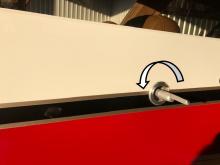
To use the tool, the exterior handle and shaft must be pulled out of the door. You should see what's left of the sheared/broken screw in the shaft. It may require some effort to remove the handle/shaft, depending on how cleanly the screw sheared off. With the handle removed you will have access to the internal door latch mechanism through the hole. Insert the square key and pin from outside the aircraft (pictured below left) and engage the pin in the slot in the escutcheon . Unfortunately you won't be able to see the pin engagement; it must be done by feel. The inside handle/sprocket may have turned enough that the slots on the interior handle/sprocket do not align with the slot in the escutcheon. If that's the case, it may be necessary to use an awl with a short 90 degree bend to re-align the slots so the pin will engage the sprocket assembly. The square key will rest against the inside of the escutcheon when correctly inserted. Once you're sure the pin is properly engaged in the slot, slide the slotted aluminum rod into the hole to fix the pin in position (pictured below right). The tool may then be turned counter-clockwise using a ½" or adjustable wrench to unlatch the door.

If you are working on the forward latch, be sure the aft handle/bottom latches are unlocked before trying to open the forward latch. It's possible, but unlikely, that the #8 screw operating the bottom latches is the failed component. If so, this process works identically for the aft door handle assembly, but the unlock direction is clockwise. If excessive force is required to unlatch the door using the tool, try putting pressure on the forward and/or aft edges of the door while operating the opener.
Getting Out If You're Locked In
In addition to carrying this tool where it can always be accessed from outside the airplane, I strongly recommend you carry tools INSIDE THE COCKPIT to open the door should the latching mechanism fail while you are inside. Because of the design, the above screw cannot fail during operation of the inside door handles. However, the connecting flex cable connectors/pins, and occasionally the latches themselves can come apart.
WARNING: Should you be trapped in the cockpit on a sunny day it is imperative that you have the aircraft moved into a hangar or shaded area immediately. The cockpit temperature can quickly reach levels that pose a grave risk.
I know of at least one Lancair pilot who was unable to complete the following procedure before directing the FBO helpers to break a window because he feared he and his wife were near collapse!
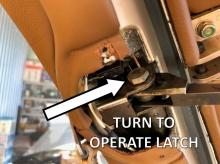 To unlatch the door from the inside you'll need a screwdriver or other tool (appropriate to your aircraft) to remove the covers from the door latches. You'll also need a ½" end wrench. Both must be carried inside the cockpit. Unless you can determine which latch/connector has failed, you'll need to remove the uppermost latch covers on the front and back of the door if the forward handle won't unlock; and the large cover at the bottom of the door if the aft handle won't unlock. The picture at right shows the "end" of the chain of latches at the upper front edge of the door with the cover removed. Note the bolt used as an operating shaft for the latch assembly and particularly the ½" bolt head. The back edge of the door has an identical latch and bolt, as do the front and back latches at the bottom of the door. With the latch covers removed, operate each door handle in turn to determine which latches are not disengaging. The ½" open end wrench will manually operate a latch that doesn't turn with the regular handle. Turn it clockwise for the front latches; counter-clockwise for the rear latches.
As a result of the interest raised at this year's LOBO Landing in San Marcos, TX, I made and shipped 26 of these door openers to folks who attended my presentation on this. I have a few extras at $25/each if you'd like to have one. They have about $1 worth of material, but are worth a good bit more if you ever have this door latching system failure! You are also welcome to borrow my tool at any time.
One last note: The door can be secured for flight with either of the two latching mechanisms on a pressurized IV or ES working, but it can't be pressurized. This can get you home to make complete repairs.
For comments/questions about this post contact Bob via email: RPastusek [at] gmail.com.