
 by bob pastusek
I recently received two requests for assistance from folks seeking to calibrate the fuel system in their Lancairs. One was a builder just completing his project; the other a "second owner" who had doubts about the useable fuel capacity reported to him by the previous owner—who was not the original builder. Both owners had digital/electronic fuel sensing systems that require calibration to be at all useful.
In a fateful twist, these requests came just after I'd read Mike Busch's excellent article, The Most Unforgivable Sin, in the April 2012 issue of Sport Aviation. In it, Mike chronicled a fatal fuel system-related crash several years ago. The accident pilot, Tony Durizzi, was an ex-airline/Air America/fly anything pilot, and probably the high-time Lancair pilot when he ran an IV-P—with known fuel system problems—out of gas approaching Flagstaff, AZ. If you ever thought that what you don't know can't hurt you, I recommend Mike's article for your consideration—it's an eye-opener.
These closely-spaced events caused me to speculate a bit about how we as a group are managing our fuel systems. I suspect there a lot of Lancair owner/flyers out there, probably some of them even LOBO members, who don't know critical information about their airplane's fuel system. So I'd like to go over some of the more obvious things.
Lancair Factory Specifications
The construction manuals specify a well-established system design and tank capacity—or do they? Lancair has changed the fuel tank configuration of most models over the years, with the exception of the Evolution—so far. Further, some builder stray from the plans, with the result being the "as built" almost certainly varies from airplane to airplane, both in capacity and plumbing.
In a production airplane, the location and installation of fuel system components is tightly controlled, and the total and useable fuel quantities are carefully determined by testing. You'll find this in the maintenance and operating manuals. Absent documentation of modifications to the fuel system—required by the FARs—you can rely on this information with a high level of confidence. Not so with our individually, uniquely built airplanes. For  example, the IV-P was originally built with internal tanks that did not extend to the end of each wing. A minor change in the pre-fabricated parts and corresponding change in the construction plans in the mid 1990's extended the fuel bays to the wingtips and raised the standard fuel capacity from about 78 to about 95 gallons. By 1999, Lancair was offering an extended range fuel kit that sealed off more of the internal wing and increased capacity to approximately 110 gallons.
Which build series do you have? Was it built to specifications? How do you know the maximum fuel capacity of your "Magic Carpet?" How much of that is usable? These are all questions you must answer before your first flight.
There are some subtle things to look for with respect to the designed fuel capacity—none visible from a casual walk around the airplane. But a walk around can only tell you "this airplane should have a capacity of approximately ### gallons," and that's only if you assume it was built according to the plans. Tony Durizzi's accident airplane was designed to hold a certain amount of usable fuel, but did not due to an error during construction that blocked the vents to the fuel cell forward of the main spar.
So how do you get answers to these questions? You can only be sure by testing.
Whether you are the builder or a second owner, design specifications are only that—design specifications. Design data should never be used for flight planning until verified via testing.
The following is a set of procedures you can use to calibrate and verify proper operation of your fuel system. The complete fuel system calibration is not exactly a morning-at-the-airport task, but well worth the time and effort. It's absolutely required if you're building, and highly recommended if you are a second owner.
Fuel System Inspection
 Let's start with some simple checks you need to complete before undertaking a major fuel system calibration/recalibration. These can be done easily without tools; I recommend you do these during your next visit to the airport if you've not done them, and repeat the checks at each condition inspection thereafter. You can do some of these checks yourself, but two people make it much easier…and more reliable.
WARNING — Gasoline contains more explosive energy than dynamite—by volume or weight. You will be working with lots of gasoline (or kerosene) and transferring it between your airplane and multiple open containers. You will almost certainly spill some during the process. You MUST do this work outside; definitely not inside a hangar; and "I didn't even know you" if you consider doing any of the following checks in your garage or basement workshop!
Flapper Valve — Each Lancair wing tank should have one-way flapper valves installed in the first wing rib out from the root. This prevents fuel from flowing from the inner-most fuel compartment—that feeds the engine—out to the wingtips during un-coordinated flight. The Lancair is particularly sensitive to outward flow because of the small wing dihedral and relative neutral lateral stability. If the flapper valves don't work properly fuel flows away from the root and can un-port the fuel pickup during critical phases of flight, causing engine stoppage. Check each wing by having your assistant lift up and down on the wingtip while you listen near the wing root. You should hear a soft but distinct metallic clicking as the valves open and close in response to the fuel being sloshed around. This check may provide inconclusive results if the tanks are completely full. If there is any doubt, check this again before you refuel. Any uncertainty about the functioning of these very simple one-way valves warrants further investigation. At least two Lancairs have been built without these flappers, "to remove a potential point of failure," according to the builders.
Fuel Vent — This is where a bathtub stopper (not your wife's), drilled to hold a short length of tubing, comes in handy. With each tank less than completely full of fuel, remove its filler cap and replace with your home-made tank vent tester. Hold the stopper in place (it doesn't have to fit tightly) and blow into the tube with your mouth.
CAUTION — This is not the time to use your fancy air compressor or other high pressure air source! An air compressor can easily over pressurize the wing and cause structural damage.
Have your assistant listen at the tank vent. You should be able to generate a steady, audible air flow out the vent with little blowing resistance. Now have your assistant cover the vent opening with her finger or a piece of tape. If you can close the vent tightly, this should generate resistance and no leakage. Well-known Lancair test pilot Don Goetz tells the story of a ferry flight in the early 1990's where, after level off, he noticed that the left wing skin seemed to be shrinking, making the ribs visible. The right wing was normal. While he was pondering this curious situation, the engine sputtered a bit and quit. Although he did not immediately connect the two events, he switched to the right fuel tank whereupon the engine immediately recovered, and the left wing gradually re-gained its proper shape. Cleaning out a mud-dauber nest from the vent tube provided a permanent fix.
Tank Fill — Check this in warm weather when the tanks are relatively empty to achieve the best results. And do this before you plan to fly—you don't want to park the airplane completely full of fuel. Fill each tank full to the top—even if you normally leave some expansion room. Install the cap and wait 5 minutes. Depending on the ambient temperature, both tanks should dump a small amount of fuel out the vent as the fuel warms to outside temperature. If either tank vents a stream of fuel there might be trapped air in some tank compartment—most likely a blocked lower internal tank tranfer gallery—that is expanding and pushing the fuel out the vent. This is what brought down Tony Durizzi's IV-P cited at the start of this article. Now remove each cap in turn and verify that both tanks are completely full. (Some overflow/spilling when you remove the cap is normal, and is the reason most do not fill their tanks to the filler port.) If a tank is no longer completely full when you make this check, it indicates a potentially blocked upper fuel transfer gallery within the wing. A blocked transfer gallery reduces usable fuel.
Fuel Shutoff Valve — Start the engine normally, then close the fuel shutoff valve. Verify that the engine stops after a short time. If it's still running after five minutes or so, you likely don't have the ability to shut off fuel flow to the engine in an emergency. NOTE: Leave the shutoff valve closed/off for the next test.
Gascolator — With the fuel shutoff valve closed, remove the gascolator bowl and carefully check the contents by pouring the fuel it contains over/through a filter media of some sort. You can use a paper towel, but a blue shop towel will show both black carbon and white/clear glass fibers easily. A small amount of debris (even some bits of metal) is normal. You should investigate further if you find a significant collection of debris, any gooey or semi-solid material or water. If you have any doubts, drain the tanks by removing the fuel drains from the underside of the wings (there may be more than one for each wing). Carefully collect and examine what comes out. A filter made from a chamois is good, but a purpose-made funnel such as this product from Mr. Funnel is even better.
Again, I encourage you to complete these basic fuel system checks if you've never done so for the airplane you are now flying, and to add them to your condition inspection checklist. They go a long way in insuring you catch any developing fuel system problems early.
With these checks completed, you can proceed with a fuel system calibration.
Fuel System Calibration
First, you will need some basic tools. As a start, you'll need about 20 feet of ½" (or larger) ID hose with an AN fitting on one end that's compatible with the exit port of your fuel gascolator. An additional fitting that will connect the hose to your engine fuel line down-stream from your fuel flow transducer will permit another important fuel system check. You'll need enough hose to reach from the engine compartment/gascolator to each of your 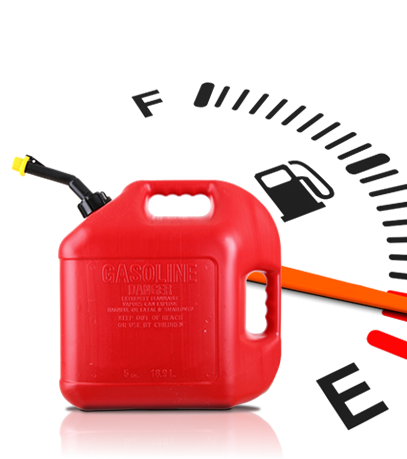 fuel filler caps, with a bit extra for maneuvering around the airplane. You can make this up from a piece of new garden hose, or use (expensive) aircraft hose, but this is hopefully needed only for a one-time use, so the only real requirements are that it be fuel-proof and clean.
You'll also need a funnel with a large exit hole that will fit into your fuel tank filler port without scratching the bottom of the tank. You'll also want a way to filter the fuel going through the funnel, so the mouth should be large enough to allow lining it with a chamois. Spread the chamois loosely across the funnel opening, push it gently into the bowl and use safety wire around the outside to hold it in place. Alternatively, use a Mr. Funnel product as listed above.
The last "special equipment" you'll need are fuel containers. Unless you have access to a container on wheels with a calibrated fuel pump, I recommend five-gallon containers. These are about the largest you can safely and comfortably hold while pouring into your tank. Four or five containers should be sufficient. You should also look for containers that are easy to transfer fuel to/from without spilling. The red, semi-transparent five-gallon containers available at auto parts stores are good for this purpose.
NOTE: Calibrate your containers. You'll be calibrating your fuel quantity in five-gallon increments; you need to make sure your container isn't actually four-and-a-half gallons! You can calibrate your containers by filling them with five gallons and making a prominent mark on them. Most already have markings that are accurate, but it's better to be safe than sorry! You'll also want to calibrate one container in 1-gallon increments.
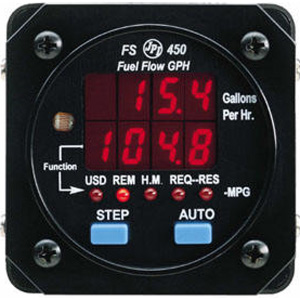
The steps below are based on calibration of Electronic International's MVP-50 engine management system, but the concepts and procedures are compatible, with minor modification, for calibrating most electronic fuel measurement/monitoring systems. (I have no affiliation with EI, but can highly recommend the company and this unit from my four years of use in N437RP) Note that the MVP-50, and most similar units, measures both fuel quantity (using capacitance probes in the tanks) and flow (using a fuel flow transducer in the engine feed line). These two independent methods of tracking fuel use provide a good cross-check, one you should exercise each time you fill up or add fuel to a reference fill point.
Setup
To calibrate your electronic fuel measurement system, you'll want to start with enough total fuel in your aircraft to fill your largest tank completely. You'll completely empty each tank by pumping into another tank, with any excess going into your containers. We'll also use the transfer process to filter all fuel a couple of times while calibrating the quantity measurement system. This will remove most sediment and particles from your fuel system. If you are already flying, take a digital level aloft with you and measure the pitch attitude, in level cruise flight, using a reference such as the spar box cover or back seat bottom (IV/ES series) that you can replicate on the ground.
NOTE: To avoid invalidating your calibration ensure the aircraft cannot rotate in the roll axis during this procedure. You'll be transferring fuel from one wing to the other and the wings must remain level. I recommend carefully placed padded sawhorses or aircraft jacks under the wing tie-down points. Usable fuel quantity and calibration are very sensitive to lateral leveling and in-flight yaw. (Remember this when you're low on fuel and determined to get home!)
Confirming maximum fuel transfer rate and calibration of the flow rate transducer is probably the simplest task, so we'll start there. Begin by moving your aircraft outside and posting a couple of high-capacity fire extinguishers. Get rid of any open flames, and I'd strongly recommend moving any electrical cords and appliances well clear of your work area. You will be creating fuel vapors and need a well-ventilated space with no ignition sources.
Fuel Flow Calibration
Fuel Flow Rate (fuel injected engines only)
 Disconnect the fuel feed line between the fuel flow transducer and the throttle body and attach the transfer hose you've fabricated for this purpose to the fuel feed line. Power up your measurement system and have your assistant run the boost pump while you measure the time it takes to pump exactly 5 gallons through the funnel/filter into a container. Record the displayed system flow rate and compare it to your measured rate (quantity/time). Depending on your fuel system set up, you may be able to check this using both the high and low boost pump speeds. You can also test the actual flow rate against the displayed rate at takeoff power and cruise fuel flow settings by using the mixture control to modulate the flow rate.
Maximum Fuel Flow Rate
Disconnect your fabricated fuel transfer line and reconnect your engine fuel line. Connect your test hose directly to the gascolator output fitting. Measure the time it takes to pump 5 gallons of fuel through the system using the high boost pump and calculate the flow rate. This should be a minimum of 150% of the required fuel flow for the engine at max power (60-70 GPH for a Continental TSIO-550).
Fuel Quantity Calibration
Minimum Useable Quantity
Set the aircraft pitch, using blocks under the nose wheel, at the approximate take-off attitude plus 2 degrees. I recommend 10-12 degrees more than level flight pitch for Lancairs, but I don't know of an "official" value for this—12 degrees exceeds the normal pitch attitude for takeoff. If you are building and have not yet flown, leveling the aircraft in  pitch and roll with the basic leveling points and measuring from this reference should provide good results.
Once you're set up, pump fuel from the tank you're measuring through your funnel/filter into the other tank until it's full, then pump any extra into your container(s) until the pump cavitates (can't draw any more fuel). Now lower the nose to cruise pitch attitude and resume pumping until the pump again cavitates, but this time pump into a calibrated container. The amount of fuel in your calibrated container is the "unusable fuel during a pitch up/go around event." The fuel remaining in the tank/lines at cruise pitch (approximately level) is your "unusable fuel" for that tank--during cruising flight only!
NOTE: You can measure unusable fuel quantity if desired (for weight and balance purposes), but it's not required for the remaining fuel system calibration. My recommendation is that you start the fuel capacity calibration at this point—with the minimum usable fuel remaining in the tank when the airplane is in cruise attitude.
Repeat this step for each fuel tank.
Fuel Capacity Calibration
Turn on the fuel measurement system and allow it to stabilize. Set the quantity calibration point for the tank at zero (zero usable fuel remaining). Now add fuel at one gallon at a time, watching for the first indication of change in the measurement system. This is the minimum quantity your system will indicate, but will likely not be accurate at this low value. Still, it's a good reference point, specifically one you'd like never to see in flight.
Continue adding measured/known quantities of fuel in accordance with your specific calibration instructions and setting your system to these values. Some systems require ¼, ½, ¾ full calibration points; the MVP-50 can calibrate in 10 gallon increments. Read and carefully follow the manufacturer's instructions. Trying to calibrate your fuel system in too small increments does not make it more accurate and likely will cause a calibration error—for which you get to start over.
As the tank fills, the indication system will stop increasing somewhat short of completely full. I therefore recommend you plan for this and record the indicated fuel quantity in your tank—below its maximum capacity—when the indicator stops increasing. Then continue until the tank is completely full and record the actual amount required. Assuming you started with the unusable fuel remaining in the tank, this is your total usable in-flight fuel for that tank. Repeat this process for the other tank(s). Your "useable in-flight fuel" should be entered as the standard fill up/reset quantity of fuel in your totalizer. It will then count down as you burn fuel, and should closely correspond to your indicated fuel as long as it's within the range of your measurement system. The fuel flow rate can be re-calibrated on most electronic fuel management systems at each fill-up. I encourage you to check this each time (it provides an early indication of a fuel leak), but recalibrate it only when your tanks are filled from near empty and your previous flight represents normal in-flight use.
Fuel System Verification
The process of pumping fuel through your tanks and lines will flush them of most debris. As noted above, it's normal to collect a small amount in the funnel/filter during calibration process. If you get a measurable amount (1/4 teaspoon?), I'd continue to flush the system by pumping back and forth through a filter until the quantity is negligible. In any case, remove and clean the gascolator filter when you finish, and CAREFULLY re-attach and check the fuel lines, including the one near the fuel flow transducer. (At least one Lancair has been lost due to a loose main fuel line in the engine compartment after maintenance.)
If you were not able to establish a level-flight pitch reference before starting this calibration test, you should do this as part of your initial test flying. If the pitch attitude differs by more than 2 degrees from what you used for calibration, I'd re-do the "0 useable fuel" test above with the aircraft in the correct pitch attitude.
During normal operation, make a habit of cross-checking your calculated fuel burn (totalizer) with total fuel onloaded and what the quantity gauges show. To do this you'll need to fill the tanks (or to a known reference level), but it's an important indication (pun intended) of the overall operation of your fuel system. Although these are independent measurement systems, they should closely correspond. My experience with the MVP-50 is that it's extremely accurate—usually within one gallon/2%.
I've run both tanks empty (one at a time) to confirm that the actual minimum usable fuel is what’s reported by the tank measurement system, and again found it accurate within a gallon. To do this, I recorded the time and fuel burn rate in cruise flight when the tank being tested reached 10 gallons of fuel, then again at 5 gallons, and again when the engine quit. The 10-to-5 gallon and 5-to-engine quit times were within a minute, and within two minutes of expected fuel exhaustion time after reaching 10 gallons, based on burn rate. (This was much better than I expected, but was under stable and controlled test conditions; you can't pitch up and accelerate for a go around and keep the engine running with this little fuel aboard!)
The bottom line is a calibrated fuel system is absolutely essential, not only to the safe operation of your aircraft, but for your peace of mind.
For questions or comments contact Bob via email: r.pastusek [at] lancairowners.com, or phone: 757-286-4802.