

by bob jeffrey
Let’s talk about the dreaded engine failure/forced-landing scenario. As you are winging your way through the ether you basically have three sources of energy available to you: airspeed, altitude and power. If you lose power, you only have the former two to rely upon. You are now in a pure energy management situation. Your life and those with you are dependent upon how well you respond and manage this energy.
It should go without saying the aircraft is expendable (yes, I know you have years of blood, sweat and tears in it), and the most important thing is to walk away from the crash site—leave the rest to the insurance company. So, as the PIC what can you do to enhance your (and your passenger's) survivability? Surprisingly, there are many things you can do, among them fly smart, practice, know your critical emergency procedures (Immediate Action/Bold Face) by heart and practice your flow patterns using the cockpit as a procedural trainer.
The Danger Zone
Statistically, most accidents happen during takeoff and landing. Also, statistically, the two highest contributors to accidents are poor judgment and ENGINE FAILURES. If you lose an engine on takeoff you had better do everything right and quickly, or you will become a statistic. Admittedly, a little luck helps when it comes to available landing sites.
Do you self-brief engine failure procedures for every takeoff? Do you involve passengers when they're aboard? Do you know the terrain and best landing sites around—especially at the ends—of your home field runways? We lost a pilot at Reno a few years ago when he elected to land straight ahead following an engine failure. We can only assume he was unfamiliar with the terrain, otherwise he likely would have simply turned 20 degrees left, toward level ground and away from the cliff he impacted.
Studies suggest it takes the average pilot four seconds to get over the inevitable shock and accept the fact an engine failure has occurred. That’s four long seconds before actually responding to the emergency. The same studies show a pre-takeoff safety brief can significantly reduce that time, because you are more mentally (and emotionally) prepared should an engine failure occur. And by keeping emergency procedures fresh in your mind you will spend less time making critical decisions once you get over the shock.
Do You Fly Smart?
Ask yourself these questions:
- Do you look cool on takeoff by lifting off and sucking the gear up while accelerating ten feet above the runway, or do you instead retract the gear and climb at Vx/Vy to 1,000’ AGL, quickly gaining altitude to expand your landing footprint in the event of an engine failure?
- In the traffic pattern, do you fly at 1500’ AGL (separating you from the slow guys at 1000’ and giving you enough altitude to make the runway in the event of an engine failure)?
- Do you fly a wide downwind, or one close enough to make the runway without power?
- Do you fly a steeper than normal final for the same reason?
- Do you take direct routes over mountainous terrain, or plan your flight to avoid it (you might be surprised how little deviation is required most of the time)?
- Do you pick potential landing sites as you progress along your route of flight? I could go on and on, but this is what I mean by flying smart.
If you are not considering safety issues like these perhaps you subscribe to the it-can’t-happen-to-me philosophy. This attitude fosters complacency. Please believe me when I say it doesn’t just happen to the other guy—it can happen to you, especially in the type of aircraft we are flying.
[Editor's note: LOBO advocates engine-out practice to maintain currency when traffic and weather conditions permit. For normal approaches we recommend pilots follow FAA guidance for stabilized approaches and traffic pattern altitudes.]
What's Your Plan?
OK, let’s talk about the actual engine failure. This is directed primarily at Legacy and IV pilots, but is applicable to all. First of all, it’s going to be a BIG surprise. You will burn some time reacting to the situation (what was that, how can this be happening to me, etc.). Did you review your engine failure procedure before takeoff?
If this happens on takeoff—and this is IMPORTANT—you MUST IMMEDIATELY pitch down from the takeoff attitude to best glide attitude to avoid a stall/spin. Do you know what this sight picture is for your aircraft? You want to perfectly hit the pitch attitude that will eventually result in max glide (120 KIAS for the Legacy RG and IV, 115 for the Legacy FG at max gross weight). If you hit that attitude perfectly your airspeed will build back to best glide, and if you started at 1000’ AGL you'll have around 600’ – 700’ left to maneuver, or around one minute. Whatever altitude remains determines the area available from which to select a landing site, so having one in mind prior to throttle up can save a few previous seconds. DO NOT attempt to make a 180 degree turn back to the runway (The Impossible Turn). I can show you an exercise that graphically proves it won’t work. I know some of you hot sticks out there practice this and feel you can safely accomplish it. It's been proven time and again that in the heat of the battle it’s a bad idea, with a high percentage of attempts resulting in a stall/spin.
If you planned for an engine failure on takeoff and briefed your procedures before throttle up won't require time to accept your fate and/or choose a landing site. This can leave a few, brief seconds for troubleshooting. If you're sure there's no fire or catastrophic mechanical failure you might try repositioning the fuel selector, or turning on the boost pump. But first and foremost you must FLY THE AIRCRAFT and concentrate on your selected landing site.
If your engine fails on downwind in the pattern you are committed to turning directly toward the runway. By the way, instead of departing straight ahead, consider a downwind departure, which improves your chances of making it safely back to the runway in the event of an engine failure. The turn to downwind makes the runway available until you have left the pattern, while a straight out departure takes you farther from the airport.
What's Your Best Glide?
The best available glide performance for your aircraft is attainable only with all the levers on the throttle quadrant full aft. Placing the prop lever full aft sets the prop to high pitch, and will make a substantial difference in your glide ratio. The data in the following table is typical of the Legacy (the numbers on the IV are a little better but the relationships are the same).
| CONFIGURATION | PROP LEVER FORWARD | PROP LEVER AFT |
| CLEAN | 1500 FPM | 800 FPM |
| FLAPS 10º | 1700 FPM | 1000 FPM |
| GEAR DOWN | 2200 FPM | 1700 FPM |
| FLAPS 40° | 3000 FPM | 2300 FPM |
You should note a couple of important relationships in this data: Your descent rate is reduced significantly with the prop at high pitch or feather. In the Legacy, this adds almost a mile of glide distance for every 1000’ of altitude—up to 2.3 NM/1000’. Also, notice the way descent rates increase incrementally with the addition of different drag elements. Ten degrees of flaps is fairly insignificant. The gear produces the next highest drag increase, with full flaps adding the most. Knowing how different configurations affect descent rates is important in a forced landing situation, because the only way to control the glide path to your landing site is with the incremental addition of drag.
NOTE: The data in Table 1: Drag/Glide Matrix is representative only. Do not use this data to develop emergency engine out procedures for your aircraft. You must develop a drag/glide matrix for your own aircraft.
The Best Pattern
If you experience an engine failure cruising at altitude you should first turn directly toward your emergency runway (you already had it picked out, right?). If you didn’t already have a runway in mind hit NRST on your GPS to see if there is an acceptable runway within gliding range (altitude is your best friend here). Trim the aircraft for best glide and attempt a restart, or secure the engine, whichever is appropriate.
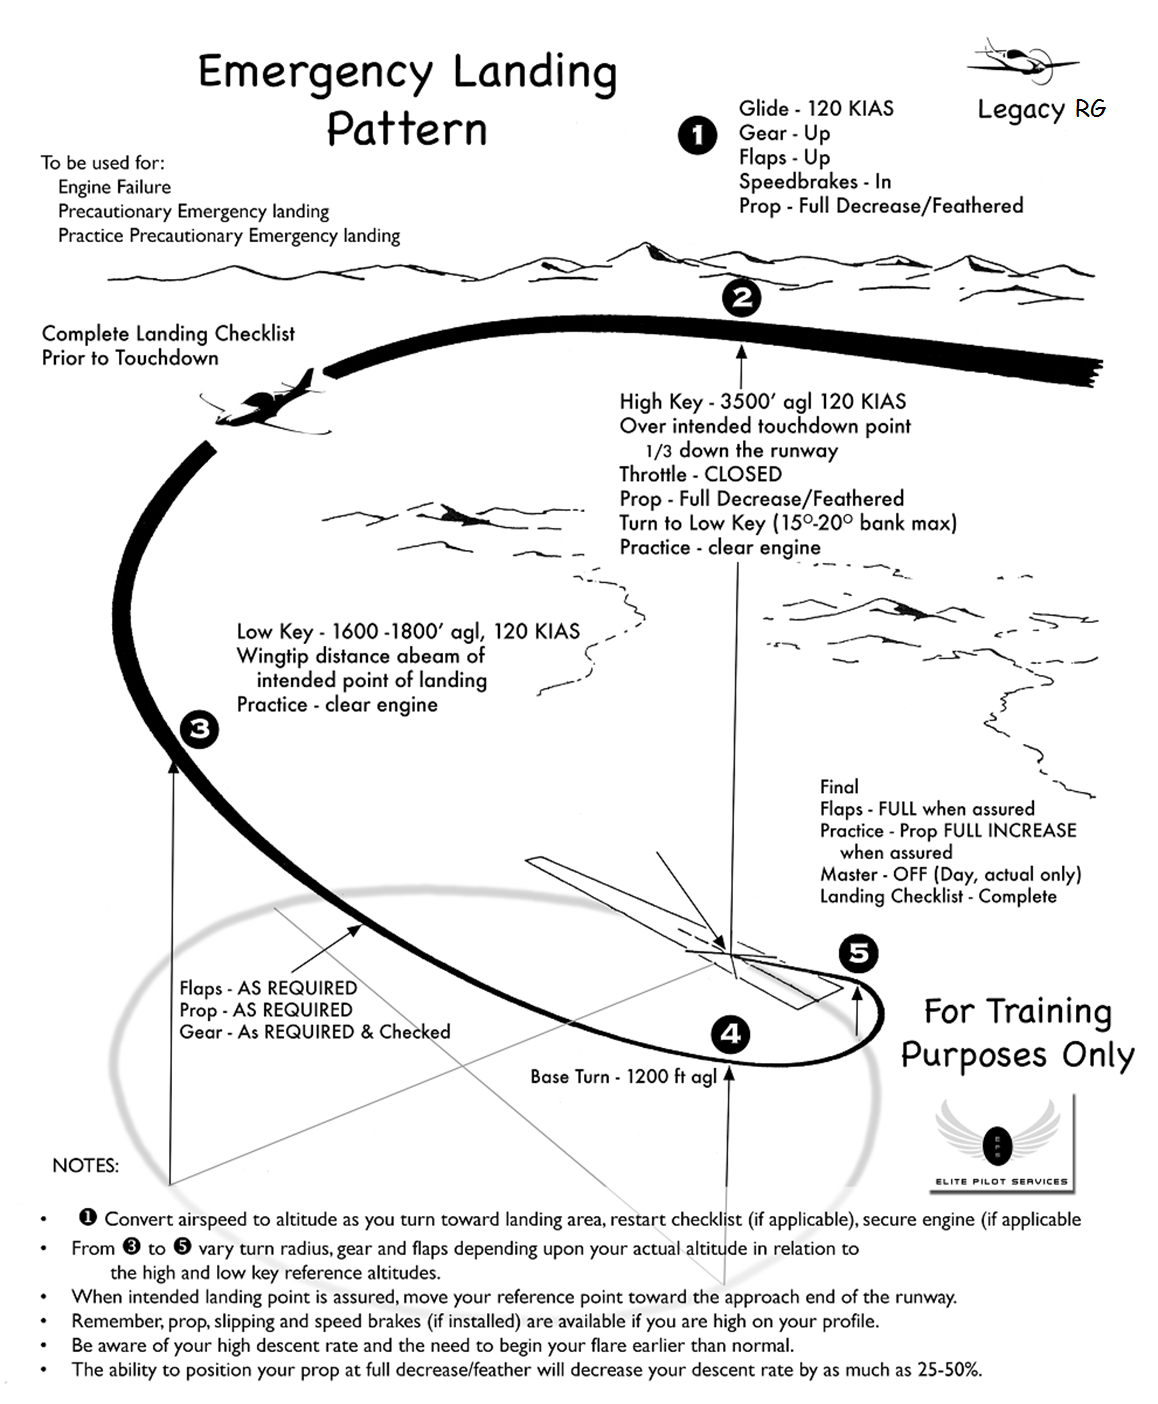 Example Emergency Landing Pattern
Once committed to a forced landing, your safest option is a familiar pattern that you have practiced, one that provides cues and milestones so you can constantly evaluate/adjust as you progress. The most proven pattern is one I learned in the Air Force, and the one we teach at Elite Pilot Services. This pattern consists of a 360 degree circling descent from directly overhead an initial planned touchdown point 1/3 the distance down the runway/intended landing site, spiraling down to the actual landing. The plan is to gauge your progress during the approach and adjust your touchdown point more toward the threshold by adding drag once you know you will make the runway. (It may seem odd at first to plan to touchdown with one-third of the available space behind you, but the theory is that if you misjudge the approach you want to err on the high side—it's better to run out of landing space at 20 KIAS than land short at 120 KIAS.)
NOTE: The included example graphic should not be used as a guide during an emergency approach. Pilots should discuss and practice emergency procedures with a training professional qualified to provide instruction in Lancair aircraft.
Key Points
The point directly overhead the initial planned touchdown point is called HIGH KEY, and is 3500’ AGL for the Legacy and IV (3000' AGL for the Legacy FG). You should be at best glide, clean with the prop aft. At HIGH KEY (assuming no wind) begin a left turn at 15 degrees of bank (this allows you to keep the touchdown point in sight and you have priority as an emergency). When you are abeam the HIGH KEY point, 180 degrees through your 360 degree spiral you are at the LOW KEY point. You should be around 1800’ AGL (1500' AGL for the Legacy FG) with the runway/landing site on your wingtip. The HIGH and LOW “KEYS” are just that: They are key points in the forced landing pattern that help you evaluate your progress on the approach by comparing actual altitude to predetermined KEY altitudes (calculate indicated altitudes before beginning the pattern by adding planned KEY altitudes to field elevation). After evaluating your progress at LOW KEY you make adjustments to the pattern (discussed below).
This pattern is flexible. If you don’t have the altitude to enter the pattern at HIGH KEY you can go directly to the LOW KEY instead. You can even land downwind if it accommodates your situation best.
If your altitude is on schedule at LOW KEY, extend 10 degrees of flaps. The last 180 degrees of turn is the most critical and requires the most judgment. Between the LOW KEY point and the point 270 degrees through the turn you should have a pretty good idea how well you are doing. If everything is on schedule and you are confident you will make the runway, extend the gear. It is here you should also begin to discern the touchdown point—the point on your landing site that is not moving toward or away from you. This is the point where your current flight path will intersect the runway surface. When there is no doubt about making the runway, you can extend full flaps. This is where you might be able to move your aim point toward the approach end of the runway/landing site.
The flare for landing is critical; you’re not used to flaring with a 3000 FPM sink rate! The ground will literally be rushing up to meet you. This is best handled by a two-stage flare maneuver. The first stage is raising your nose at approximately 50'–75' above the runway to arrest the high sink rate, reducing it to a normal approach descent rate. You can then transition to a normal flare for landing. This is one of the reasons you carry 110—120 KIAS throughout the pattern. If you are slow, you will run out of energy during the transition and flare resulting in a high sink rate and possible hard landing.
Why A 360° Pattern?
The 360° pattern is the ideal when you have enough altitude to pull it off. The most difficult situation would be a straight-in approach. You won’t have the KEY positions to judge your progress. After the engine fails and you are heading toward your selected landing site, stabilized in a 120 KIAS glide, look for the spot on the surface that is stationary and not moving up or down in the windscreen. THAT is where your glide path intersects the ground. This spot will become more apparent as you lose altitude. If that spot is not on or beyond your intended landing site, then you are not going to make the landing site.
Adjustments
If you are high at LOW KEY, you can configure (add drag) early, widen the pattern or extend the downwind slightly (be careful how far you go—especially with any wind—since you will have to traverse the same distance you extended to get back to your landing site). In addition, remember what you have available to increase your drag and descent rate: gear, flaps, speed brakes, prop control, slip, etc.
If you are low at LOW KEY, you can tighten your pattern, delay configuration, etc. You could find yourself so low at LOW KEY that you must continue your turn to the landing site while holding gear until just before the initial flare maneuver and never extending flaps.
Stay Vigilant
A common (and very dangerous) error I often see is a pilot reducing the bank angle during the last 90 degrees of turn. If you don’t maintain an appropriate bank angle throughout the spiral you may be tempted to use high bank angles (increased AOA, wing loading) at low altitude to recover. This is a classic overshoot-followed-by-a-stall/spin scenario. You can avoid it by vigilantly maintaining your bank angle until aligned with the landing site.
Practice
First, create a drag/glide matrix for your aircraft. This requires a lot of altitude and still air. Establish best glide with the throttle at idle, then determine the numbers for different configurations with the prop control forward. Start with a clean configuration and add drag. Do the same thing with the prop control aft. You will probably have to climb back up after doing the first half of the matrix. Be sure to stabilize your engine temps to avoid shock cooling at idle.
NOTE: I’ve found a number of Legacys are set up on the rich side, which means your engine might try to quit with the throttle at idle for this exercise (and also when practicing forced landing patterns). If your engine won’t continue running throughout these exercises you may need to have the fuel system calibrated.
Once you’ve established a drag/glide matrix you can practice the forced approach pattern with the prop forward. Simply add power until you achieve the same glide performance as your measured engine idle/prop aft configuration. This will be around 800 FPM.
When you practice forced landing patterns you should find an airport without traffic (I know this can be difficult). I have had some success at smaller towered airports by talking to the controllers about the maneuver beforehand and practicing during dead periods.
Once you have developed your judgment by flying a number of full patterns, try some GLIDE PATTERNS. For a GLIDE PATTERN just start your glide at LOW KEY. Since the first half of the pattern is canned from HIGH KEY to LOW KEY, starting at LOW KEY will save time and wear and tear on your bird. Set yourself up at the LOW KEY position with varying parameters, i.e. high, low, wide, tight, upwind, downwind and fly your pattern from there, developing the judgment to make appropriate adjustments.
When practicing on your own I recommend you initially terminate your patterns with a low approach beginning at the first stage of the flare (breaking your high descent rate). Start at 200’ or so initially and work your way down as you gain experience and sharpen your judgment. Be very conservative here and DO NOT attempt a landing out of it until you have developed this judgment and have a long runway. Don’t get distracted and forget to manage your fuel.
Wrapping Up
The 360 forced landing pattern has been proven tried and true over many decades. If you plan ahead, know the numbers for your aircraft, compute the altitudes at HIGH/LOW KEY and make the appropriate adjustments based on acquired judgement you can tremendously improve your chances of getting you, your passengers and your aircraft down safely. I hope I’ve inspired you take the time to practice this life-saving procedure so that if (when?) someday your engine quits you are prepared. Bob Jeffrey is a test pilot/instructor for Elite Pilot Services. Visit EPS on the web to contact Bob if you have questions/comments on this article.